
10 Street Photography Tips
Mirrorless cameras are just perfect for candid urban photography. They're smaller and lighter but at the same time just as capable as their big DSLR brethren. I love shooting with my Fujis when I'm out and about, and I know for a fact that I'm not alone with that opinion. Here are 10 little tips that may help you when you're out there on the streets! Some are meant more specifically for the Fuji X cameras but most of them work just as well with other cameras of course.
1. Set viewmode to "EVF only"
The last thing you want is your camera's bright screen to draw everyone's attention when it's getting dark outside. The button on the right side of the viewfinder bump on the X-T1, appropriately labelled "viewmode", cycles through the different options here. "EVF only" keeps the screen turned off, while the viewfinder stays on all the time, which not only is less eye-catching, but also a lot quicker to use, because the eye sensor always takes a little moment to switch to the EVF.
2. Use manual when you know you can (and combine it with the T!)
It is often a good idea to stay in either aperture or shutter speed priority modes for street photography, but when the light isn't changing that much and you're staying a bit in the same area, try to go full manual as often as you can. On one hand, you learn a lot about exposure that way and how to predict the best settings for what you want to achieve, and on the other hand, you definitely end up with more keepers. Bonus tip for extra quickness: set the shutter speed dial to "T" to effortlessly change your shutter speed with the camera's front dial, instead of fiddling around with the the top dials on your camera to do so. This can make all the difference when you're trying to capture that precise moment.
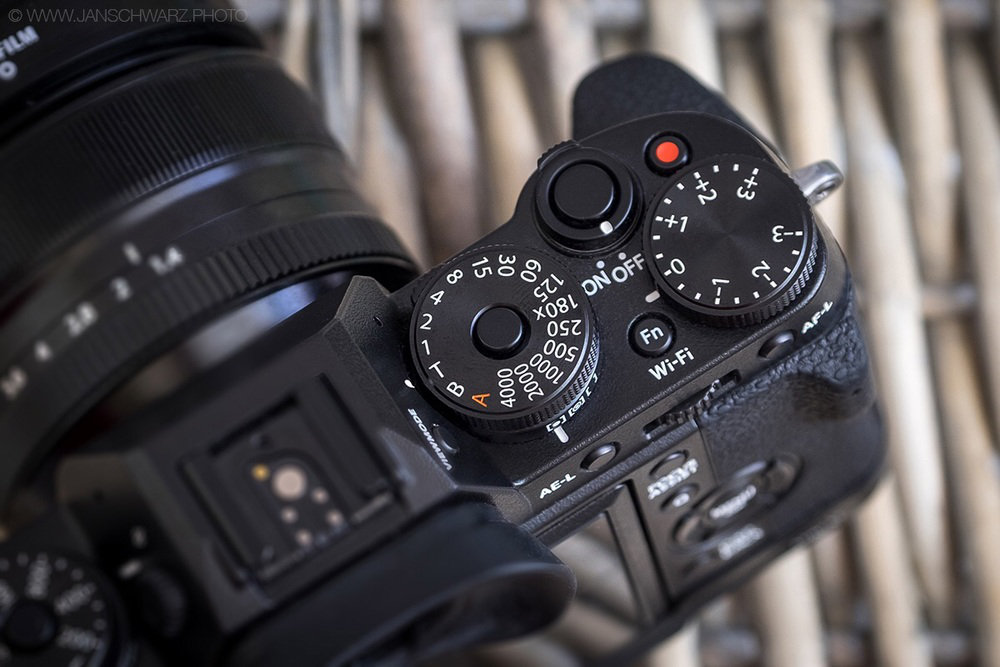
Set the shutter speed dial to the 'T' position for some extra speed in manual mode!
3. Use lenses with a wider angle
Longer focal lengths are sometimes the easy choice for candid shots, since you can stay further away from the action, so that people often won't even notice you. But apart from this being a little bit too cheeky for my taste, it also makes your photos less lively. Wide angle lenses force you to get in there, to be in the middle of the action, which also makes for more tangible and vibrant photos. They also bring a technical advantage: wider angles are faster at focussing since you usually end up with more depth of field which makes the task easier for your camera. A good technique here would be zone focusing (manually pre-focussing to a certain distance), which again profits from and even requires the increased depth of field.
4. Use primes
Zooms are a great option to stay versatile, especially on vacation, where you don't want to lug around all your gear. Still, I'd rather go with a couple primes for several reasons. They're smaller and lighter, so that you can easily put a couple of them in your pocket. Then, they force you to get in the right spots to get the picture you want, which often leads to more interesting shots. Another point is that they're usually better in low light due to their larger apertures. Also, some of them have handy depth of field scales on them, that help with zone focusing. Many cameras also show this handy scale right on the screen or on the EVF though.

Primes and especially wide angles are perfect for urban photography. You have to get close to get interesting shots though.
5. Don't be afraid of the high ISOs
A few years ago, APS-C sensors weren't that great in low light. This has changed quite a bit since then, and I can assure you that I barely see a difference between an X-T1 file and a Canon 5D Mark III file when they're shot at ISO 3200 or 6400. A lot of people would even prefer a grainier look, so they keep the ISOs high anyway. Although I tend to always keep the ISO as low as possible to have the maximum leeway in post production, I'd say there's no need to be afraid to take it as high as necessaryto get the picture. A grainy picture is salvageable if you don't like the effect but what counts in the end is that you at least got the picture!

High ISO can sometimes add to the atmosphere but still, keep them only as high as necessary. You can easily add grain in post if you want to.
6. The WiFi trick
A nifty little trick, although a bit cheeky too, is to use WiFi to shoot people on the streets. The gesture of lifting the camera to your eye is often enough to distract people, so that you miss a candid moment. So how about this setup: Let the camera hang around your neck on a camera strap while connecting it wirelessly to your smartphone. Now get in the right spot and just snap away while looking at your phone! As long as nobody looks at your screen, this is as inconspicuous as it gets! Just please, don't be like a creep. Here again, wide angle lenses and zone focusing help a lot.
7. Electronic shutter (but not always)
Since firmware 3.0, the X-T1 has gained the option to shoot with an electronic shutter, with a shutter speed of up to a 32000th of a second. This can help to keep your aperture wide open in bright light but there's another advantage: it is completely silent! For obvious reasons, that can be very helpful when shooting candid photos. But there's one caveat: The sensor readout is veryslow, which results in a rolling shutter effect. In human language, this means that things get distorted when they move too fast in the frame or when you move the camera too much during the exposure.
8. No focus assist light
This is one of the first settings I change when I buy a camera. Focus assist lights are a great idea in theory. When it gets to dark for the camera to properly use the autofocus, it has the ability to activate a small LED light in the front to make it easier so detect contrast. The bad thing here is that as long as your subjects aren't inanimate objects, they willget distracted by the bright beam of doom you're shooting in their face! You're better off without it.

See that yellow LED? It's the destroyer of candid moments. Turn it off.
9. Turn off camera sounds
Like the last point, this one's rather obvious. We're trying to not be seen here, so turn of the camera sounds in the sound setup menu. You're welcome.
10. Use gaffer tape
One of the staples of anyphotographer, gaffer tape helps in most every situation. The black version is also a good means to make your camera look like it's really a crappy old piece of junk. In some areas and situations, that can be a good thing. Use the tape to mask logos and names on your camera or even put it around the lens hood to give it an even shoddier look. Taping the LED indicator on the thumb rest would be another bright idea. Bright. Yeah, that was clever, amirite?
There you go, those are some of my tips! Anything you'd want to add here that you think is helpful for inconspicuous shooting? Let me know in the comments and as always, don't forget to share this article on your social networks! Thanks for reading!